NodeMCU Web Server + Thermistor
In this project we are going to create a prototype of a remotely accessible sensor (one so far, for multiple sensors, see the next tutorial).
In other words, you will be able to read sensor (thermistor, in this example) data, which means receiving data FROM server. You wil also be able to send commands to server, in our case it is going to be turning on and off the light diode, but same logic applies to controlling motors and so on.
Important note: we are going to create a web server that works with your modem within your LOCAL network. It can not be seen from the outside Internet. So you can use this approach for your IOT projects, but can not post data to the Web (a different approach exists). The "local" approach is generally safer, so when it comes to IOT, it should be considered first. In other words, this project is for sending data from the window in the second floow to a computer on a first floor, nothing else.
Schematics
ESP8266 has only one analog pin (A0), so we are going to use the following schematics:
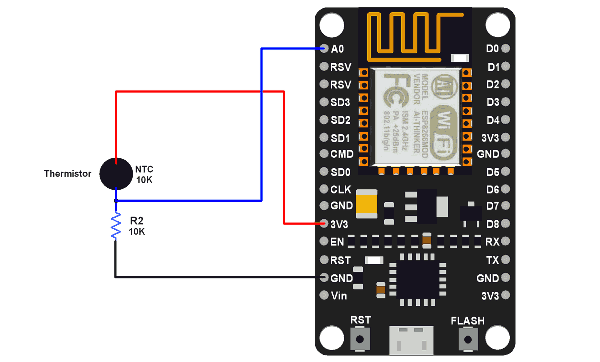
As you can see, it is same as in previous tutorials, the only difference is, we send data over WiFi, in addition to serial connection over COM port.
Arduino code
First of all, let's create a web page that we want to display, it will show the temperature and will anso have buttons to turn the diode on and off. What we do is keeping a JavaScript code in a Arduino (C++) string; this code will be dynamically altered with new temperature data and displayed in a browser on a receiving computer.
The code was inspired by Circuits4you.com, a site that is highly recommended.
A side note: we use JavaScript to change values as new data arrives from the server. It means that we don't have to redraw the entire page every time: a very convenient feature.
index.h
const char WEB_PAGE[] PROGMEM = R"=====(
<!DOCTYPE html>
<html>
<head>
  <!-- Make sure there is no icon -->
  <link rel="icon" href="data:,">
</head>
<body>

<div>
	<h1>NodeMCU Web Server + Thermistor</h1>
		<!-- Two buttons in this example. Of course, in a real life
			a single On/Off switch should be used -->
		<button type="button" onclick="sendData(1)">LED ON</button>
		<button type="button" onclick="sendData(0)">LED OFF</button><br>
</div>

<div>
  LED State is : <span id="LEDState">NA</span>
  <br>Thermistor: <span id="thermistor">NA</span>
	(Raw ADC Value: <span id="ADCValue">0</span>)
  <br>
</div>

<script>
function sendData(nLedState)
{
  var xhttp = new XMLHttpRequest();
  xhttp.onreadystatechange = function()
  {
    if (this.readyState == 4 && this.status == 200)
    {
      document.getElementById("LEDState").innerHTML =
        this.responseText;
    }
  };
  xhttp.open("GET", "setLED?LEDstate="+nLedState, true);
  xhttp.send();
}

// This is a function of JavaScript: a scheduler
setInterval(function()
{
  // Call this function in cycle every 2 seconds
  getData();
  getSensors();
}, 2000); //2000 mSeconds

function getSensors()
{
  var xhttp = new XMLHttpRequest();
  xhttp.onreadystatechange = function()
  {
    if (this.readyState == 4 && this.status == 200)
    {
      document.getElementById("thermistor").innerHTML
		= this.responseText;
    }
  };
  xhttp.open("GET", "read_sensors", true);
  xhttp.send();
}

function getData()
{
  var xhttp = new XMLHttpRequest();
  xhttp.onreadystatechange = function()
  {
    if (this.readyState == 4 && this.status == 200) {
      document.getElementById("ADCValue").innerHTML =
      this.responseText;
    }
  };
  xhttp.open("GET", "readADC", true);
  xhttp.send();
}
</script>
</body>
</html>
)=====";
Note that we are storing the entire web page in a C++ variable. This code is stored in the index.h file, which is a C++ include file. We will include it in the main file of our program.
thermistor_web.cpp
#include
#include
#include

// Include HTML template header
#include "index.h"

#define LED 2  // Arduino's on board LED

//SSID and Password of your WiFi router
const char* ssid     = "this_is_my_id";
const char* password = "this_is_my_password";

//Server on port 80
ESP8266WebServer server(80);

// ---

// NodeMCU uses 3.3v
const double dVCC = 3.3;

// 10k ohm resistor
const double dR2 = 10000;

// 10-bit adc
const double dAdcResolution = 1023;

// thermistor equation parameters
const double dA = 0.001129148;
const double dB = 0.000234125;
const double dC = 0.0000000876741;

// This routine is executed when you open its IP in browser
void handleRoot()
{
 String strHtml = WEB_PAGE; //Read HTML contents
 server.send(200, "text/html", strHtml); //Send web page
}

// ---

double adcToTemperature(double dRawAdc)
{
  double Vout = (dRawAdc * dVCC) / dAdcResolution;
  double dRth = (dVCC * dR2 / dVout) - dR2;

  //  Steinhart-Hart Thermistor Equation:
  //  Temperature in Kelvin = 1 / (A + B[ln(R)] + C[ln(R)]^3)
  //  where A = 0.001129148, B = 0.000234125 and C = 8.76741*10^-8

  // Temperature in Kelvin
  double dTemperature = (1 / (dA + (dB * log(dRth))
	+ (dC * pow((log(dRth)), 3))));

  // Temperature in degree celsius
  dTemperature = dTemperature - 273.15;

  return dTemperature;
}

// ---

void handleSensors()
{
  // Temperature in degree celsius
  int nTemperature = (int)adcToTemperature(dRawAdc);

  Serial.print("Temperature = ");
  Serial.print(nTemperature);
  Serial.println(" degree celsius");

  String strTemperature = String(nTemperature);

  //Send ADC value only to client ajax request
  server.send(200, "text/plane",
	strTemperature + " degree celsius");
}

void handleADC()
{
 int a = analogRead(A0);
 String adcValue = String(a);
 //Serial.println(adcValue);

 //Send ADC value only to client ajax request
 server.send(200, "text/plane", adcValue);
}

void handleLED()
{
 String ledState = "OFF";

 //Refer  xhttp.open("GET", "setLED?LEDstate="+led, true);
 String t_state = server.arg("LEDstate");

 //Serial.println(t_state);
 if(t_state == "1")
 {
  digitalWrite(LED,LOW); //LED ON
  ledState = "ON"; //Feedback parameter
 }
 else
 {
  digitalWrite(LED,HIGH); //LED OFF
  ledState = "OFF"; //Feedback parameter
 }

 server.send(200, "text/plane", ledState); //Send web page
}

//===

void setup(void)
{
  Serial.begin(115200);

  //Connect to your WiFi router
  WiFi.begin(ssid, password);
  Serial.println("");

  //Onboard LED port Direction output
  pinMode(LED, OUTPUT);

  // Wait for connection
  while (WiFi.status() != WL_CONNECTED)
  {
    delay(500);
    Serial.print(".");
  }

  //If connection successful show IP address in serial monitor
  Serial.println("");
  Serial.print("Connected to ");
  Serial.println(ssid);
  Serial.print("IP address: ");
  //IP address assigned to your ESP
  Serial.println(WiFi.localIP());

  //Which routine to handle at root location. This is display page
  server.on("/", handleRoot);
  server.on("/setLED", handleLED);
  server.on("/readADC", handleADC);
  server.on("/read_sensors", handleSensors);

  //Start server
  server.begin();
  Serial.println("HTTP server started");
}

//===

void loop(void){
//Handle client requests
  server.handleClient();
}
So we have 3 kinds of requests here:
setLED turns the led on and off;
readADC reads RAW sensor data and sends it to web page;
handleSensors turns raw data to temperature
and sends it in a human readable form.
The javascript, defined in an include file, repeats the request to server every 2 seconds.
Testing the Web Server
Now, you can upload the code, and it will work straight away. Don’t forget to check if you have the right board and COM port selected in Arduino IDE, otherwise you’ll get an error when trying to upload. Open the Serial Monitor at a baud rate of 115200.
Finding the ESP IP Address
Press the ESP8266 RESET button, and it will output the ESP IP address on the Arduino IDE's Serial Monitor. Alternatively, wait until connection succeeded: the address will be displayed in the monitor.
Accessing the Web Server
Open your browser, type the ESP IP address, and you’ll see the following page. This page is sent by the ESP8266 when you make a request on the ESP IP address.
Click the button: the LED diode goes on and off.