XY-PWM signal generator.
This device can be used if we need to generate PWM signals. It has hardware buttons, so we can adjust frequency "by hand". It also has RX/TX pins, which allows us to change the frequency programmatically, say, from Arduino.

Powering it up
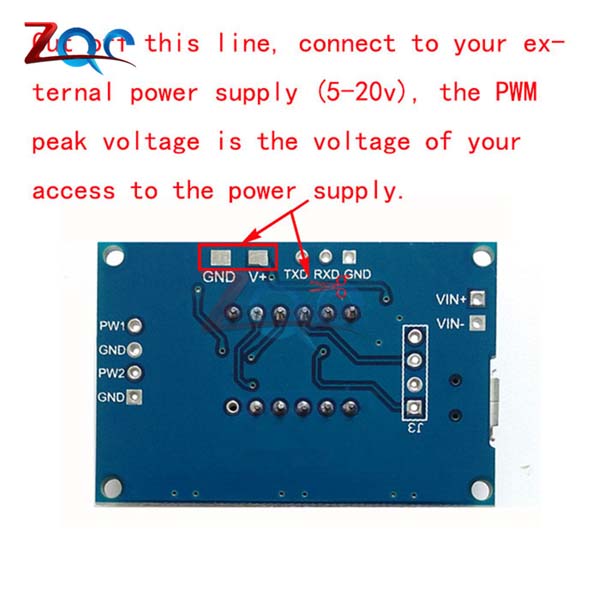
A rather cheap solution (a jumper would be much more convenient) is a "cut this wire if you want to use an external power source (rather than USB power). I am going to use an external power source, so I took a knife and cut the wire.
A VERY important note: if you use NodeMCU as a controller, it can not provide 5V power for generator, so you need a separate power source. One can think that it is possible to do with Arduino's provided 5V: the answer is NO. As you connect Arduino's 5V as a power source, the generator drains too much power and attemp to upload a sketch fails with something like:
avrdude: stk500_getsync() attempt 1 of 10: not in sync: resp=0x00
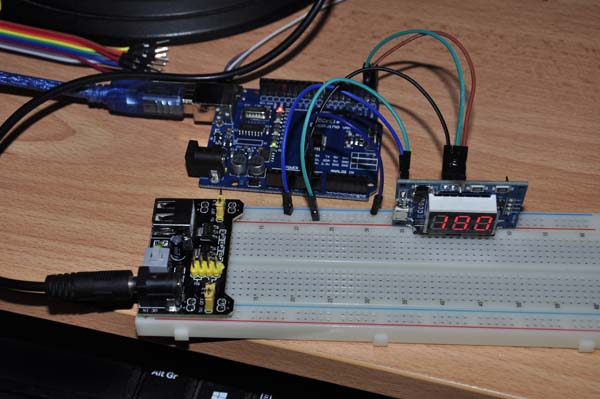
At the photo below, ypu can see Arduino powered by USB from the PC, while the generator is powered through a separate 5V power sourcs: this approach works fine.
Setting it up
The following is a surprisingly detailed description I have copied from Ali (usually they have no descriptions whatsoever):
Two independent generators, you can set frequency and working cycle.
...
Frequency is represented as three ranges:
XXX (no digital point): 1 Hz - 999 Hz;
X X.X (one digital dot): 0,1 kHz - 99.9 kHz;
X.X.X. (three digital dots): 1 kHz - 150 kHz;
Example:
"100" means that the frequency is 100 Hz;
"54,1" means 54,1 kHz;
"1.2.4" means 124 kHz;
Working cycle is in range 0 - 100;
All three frequences of the working cycle are the same, all parameters are not energy dependent.
Module parameters:
Working voltage is 5 - 30V, micro USB power is supposed to be 5V;
Frequency range 1 Hz - 150 kHz;
Frequency is within ± 2%;
Output current: <30mA;
Output voltage: 5V (can be set);
Temperature range: -30 ~ +70°;
Setup:
The module has 3 setup buttons: set, up, down;
Press [Set] to select one of four parameters: (FR1: frequency PWM1; dU1: working cycle PWM1;
FR2: frequency PWM2; dU2: working cycle PWM2), before parameters are set, the corresponding name will flash.
Set [Up], [Dn], to change the parameter value (long press is supported).
Two independent outputs, each can be set separately, (XXX: 1 Hz ~ 999 Hz; X X.X: 0,1 Hz ~ 99,9 Hz; X.X.X .: 1 kHz ~ 150 kHz);
Serial control
Data transfer speed at 9600 bits per second;
Data bits: 8
Stop bits: 1
Parity: no
Flow control: no
1. Setting frequency
«S1FXXXT»: setting PWM1 XXX Hz (001 ~ 999)
«S1FXX.XT»: PWM1 X X.X kHz (00,1 ~ 99,9)
«S1F: X.X.X.T»: PWM1 XXX kHz (001 ~ 150 ..)
'S1': PWM1
'S2': PWM2
'F': frequency
'D': working cycle
'T'-flag of the end of command
Setting the working cycle
«S1DXXXT»: setting the working cycle PWM1 XXX; (001 ~ 100)
"S2DXXXT": PWM2 working cycle XXX; (001 ~ 100)
Connecting it to Arduino

In this particular project I used Arduino Uno, it only has one pair of serial pins: 0(RX) and 1(TX). The following program sets frequency from 50 Hz to 900 Hz, and then to 50 Hz again, in cycle. It also can optionally blink a diode, which is just a decoration.
Note that I am not sending any logs to PC by Serial: serial is used to control the generator.
//String setPWM;
char dc_command[10] = {}; //7 characters+null terminator
int nCounter = 0;
int setPWM = 60;	// Set 60 Hz before the cycle

void setup()
{
  pinMode(2, OUTPUT);	// Blinker
  Serial.begin(9600);
}

void loop()
{
  if(Serial.available() >0)
  {
	// serial is used to control the generator
    //Serial.println("Serial avail");

	// Serial is available, fast blinking
	digitalWrite(2, HIGH);   // turn the LED on (HIGH is the voltage level)
    delay(500);
    digitalWrite(2, LOW);
  }
  else
  {
	// serial is used to control the generator
    //Serial.println("Serial not avail");

	// Serial not available, slow blinking
	digitalWrite(2, HIGH);
    delay(2000);
    digitalWrite(2, LOW);
  }

  // Every 10 cycles (5 seconds) increase frequency
  if(nCounter % 10 == 0)
  {
	//%.3d will ensure XXX: S1F060T
    sprintf(dc_command, "%s%.3d%s\r\n", "S1F", setPWM, "T");
    Serial.write(dc_command);
    setPWM += 10;
  }

  nCounter++;
  // Reset cycle if reached 900
  if(setPWM == 900)
  {
    nCounter = 0;
    setPWM = 50;
  }
}