Robotics and AI at snowcron.com
All you need to know about Robotics, AI and what to do with them.
A fair warning: Robotics does require certain knowleges. So when I say "take pliers",
I assume you know which end to hold. In other words,
Please read the disclaimer
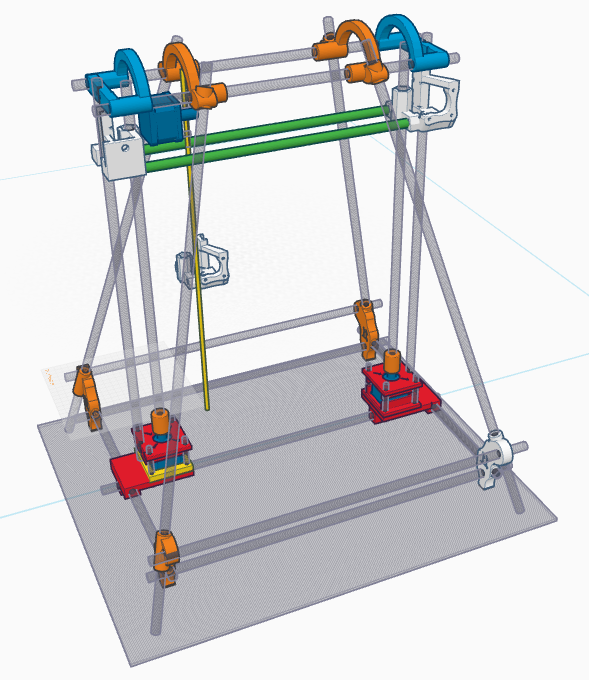
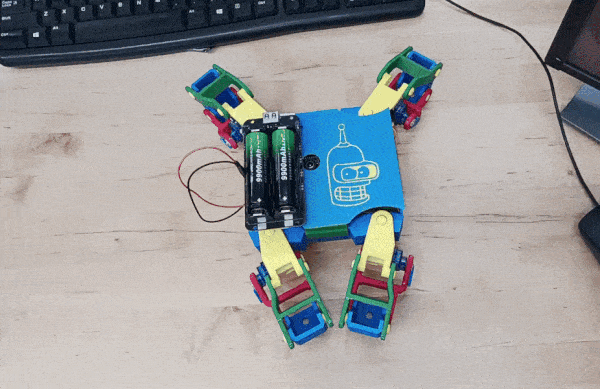
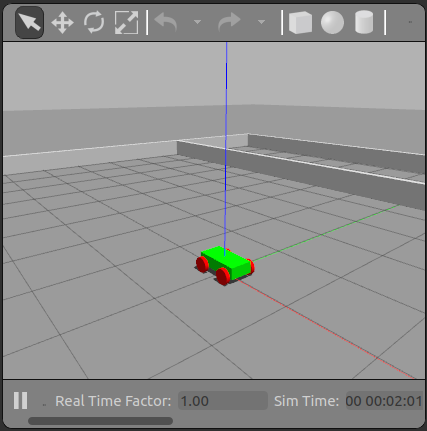
3D Printer: DIY (click arrow for details):
Subscriptions.
Good news, everyone! (C)
I have implemented by-subscription access to some sections on this site. I hope this desperate measure will find your understanding.
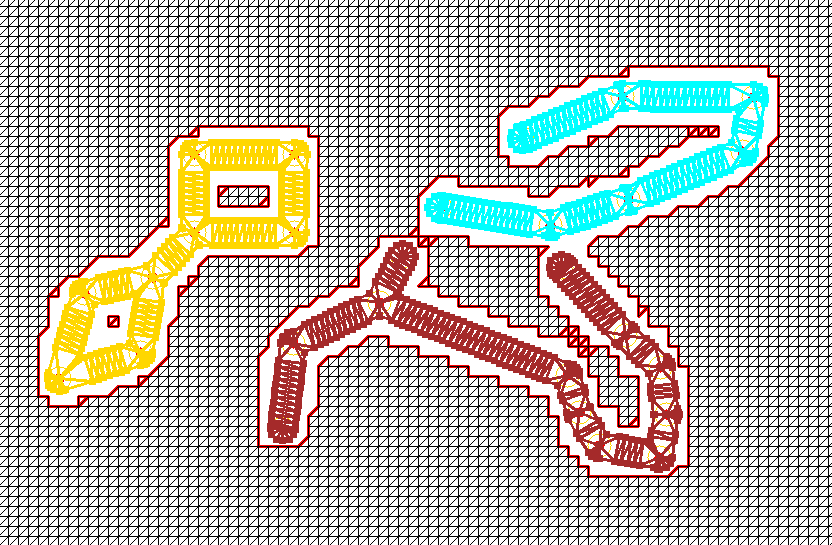
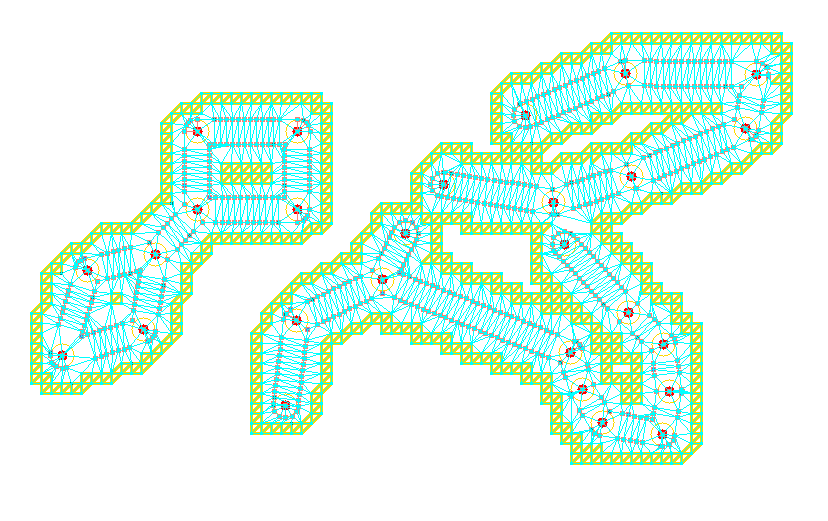
May 1, 2026. 2.5d Landscape Designer.
I have completely redesigned the landscape designer, which is a tool to create 2.5d landscapes for Gazebo simulations. It is not a simple script anymore but a full scale utility with a GUI, which allows to create landscapes from topo maps, edit them, add roads and so on.
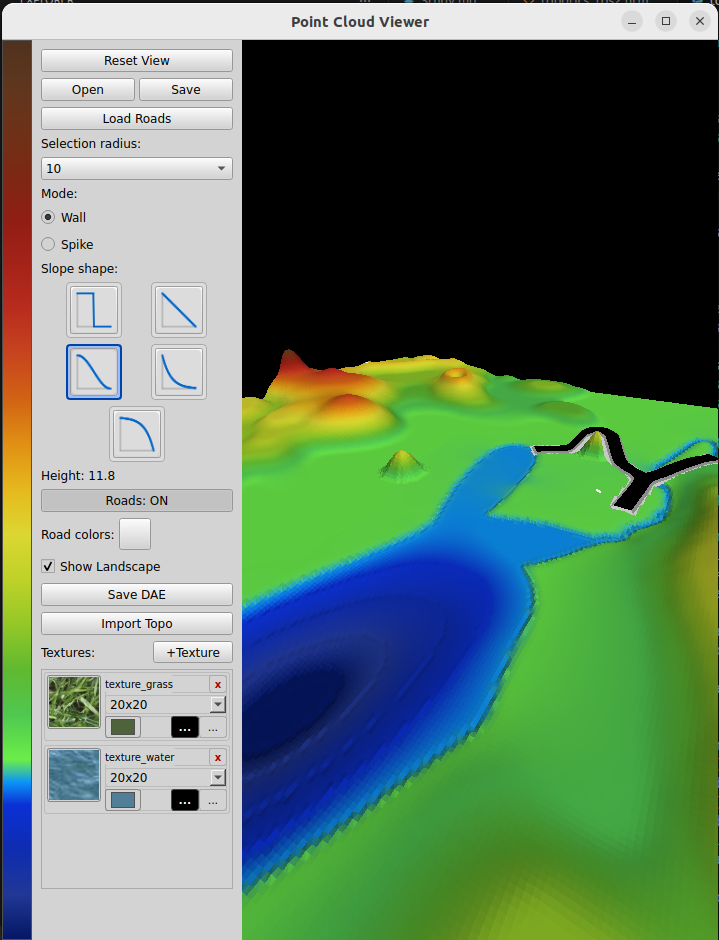
It allows the user to load road networks thet were exported from the map_editor utility:

You can add "hills" and "valleys" to the landscape, adjust the terrain elevation:

Textures can be "painted" into the landscape:

User can export the result as DAE, and use it in simulators, like Gazebo.

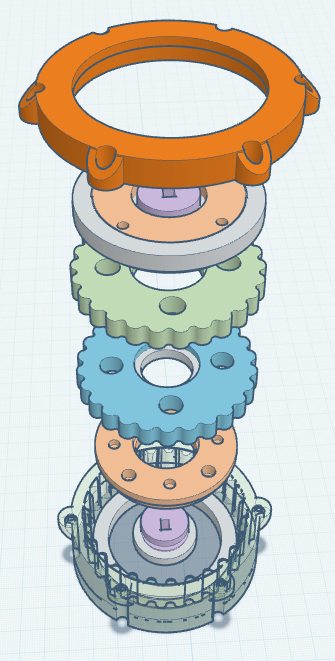
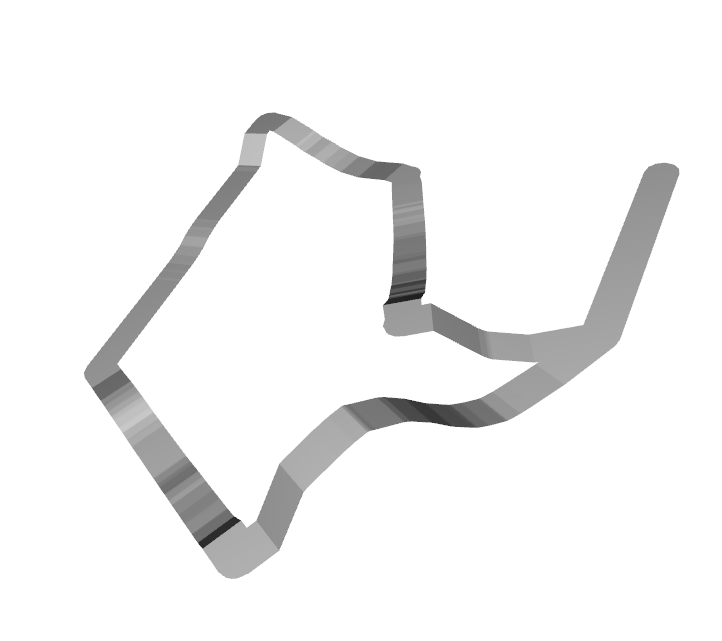
Mar 8, 2026. 3d Printed cycloidal reductor.
When we design robotic arm, we face a rather standard challenge. Motors usually spin very fast, and "fast" also comes with
"low torque". A common NEMA-17 has something arouns 1kg/cm, which means 10 g/m. In other words, robotic arm that uses
NEMA-17 - and it is a good motor - that is 1 meter long will be able to lift 10 grams.
But in the same time NAMA-17 can go as fast as 300 rpm. So by reducing it to 1 rpm, we will have 300g/meter,
which is much better. If we make our robot smaller, with 0.5 m arms, it makes 600 g load, so your robot
will be able to pass you a cup of tea. But not a beer bottle, as this 600g include the weight of the hand itself...
In this small tutorial I am going to explain what cycloid reductor is from inside and why (the part that other tutorial usually skip).
Jul 5, 2025. Robotic Spider, Ground up, Complete tutorial.
There are two reasons for this tutorial.
First, 99.99% of online guides take a different approach. Put these parts together, download this (and the link would probably be broken) software, install it, if you can... I want a guide, not a quest.
Second, if you search for robotic spiders videos, most of them (spiders, not videos) are jerky. The reason is simple: they use servo motors, and if you use servos' built-in commands, they are just "rotate to this position as fast as you can". And as the result, you get your Star Wars inspired robot that move its legs at a fraction of a second, destroying the sense of power and hiding motion algorithm design flaws, too.
So, let's do it right.
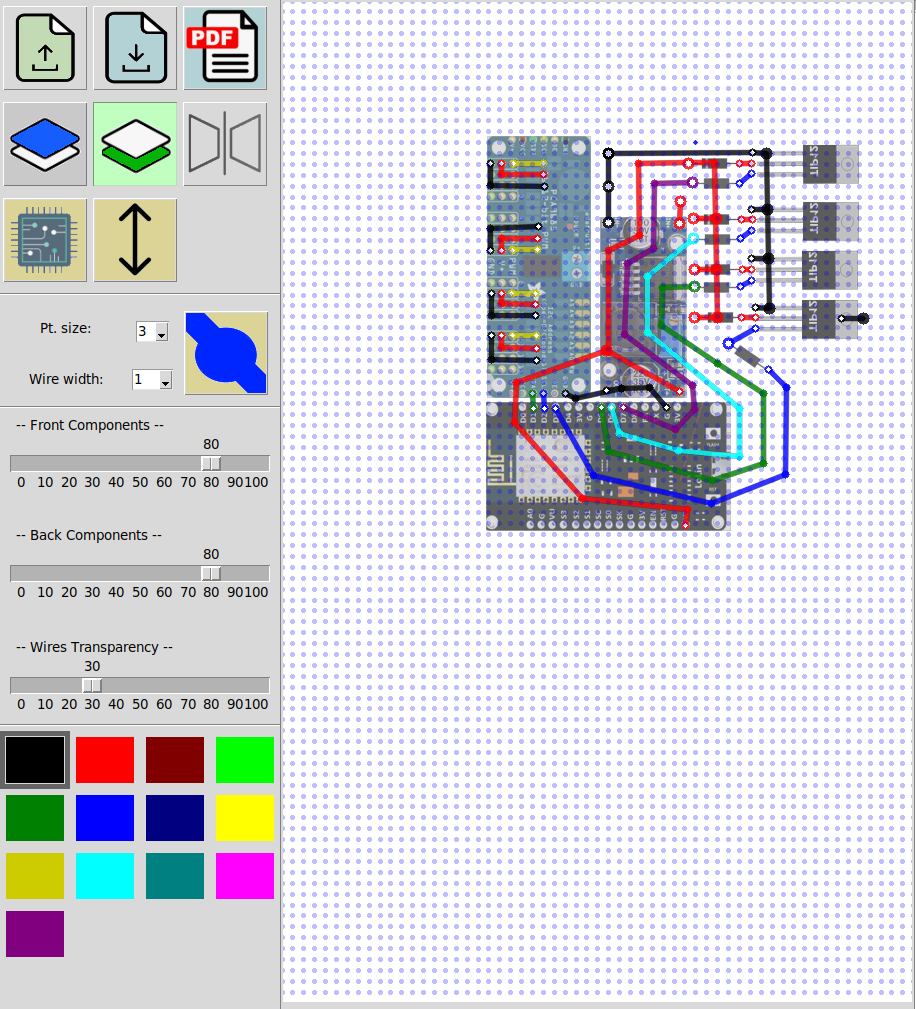
May 24, 2025. Using 3d printer to create PCBs.
Earlier, I have presented a rather primitive PCB editor that allows you to draw very simple PCBs for your DIY robots. It can then export these PCBs to g-code files that 3d printer can understand. Now we can print these schematics on a PCB.
First of all, why do we need to print on a Printed Circuit Board? The idea is to draw our wires on a board's copper covered surface with some kind of a protective paint, and then to dissolve the areas that are not covered. Do not worry, dissolving is an easy task and i will cover it in my next post.
In this post I have created a simple add-on to an extruder of a 3d printer that turns it into a 2d plotter. And if your 3d printer has different extruder, you can design your own plotter head using mine as an example.


On sites like Thingiverse you can find many alternative designs. So let me stress the advantages of mine: it uses a spring. Two fragments of a credit card (debit, discount or id cards will do) is used to make sure that the marker presses firmly against the surface and in the same time, doesn't press too hard, destroying the tip. That makes this design much less sensitive to errors in vertical positioning of a pen: few millimeters up or down are not critical.
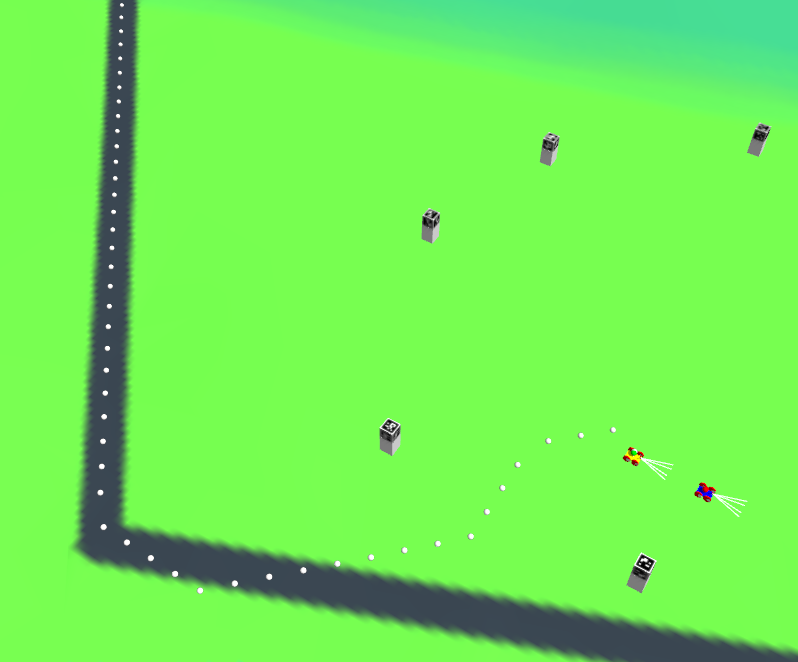
Apr 13, 2025. Path Follower revisited.
In this section I introduce a fully functional Path Follower for our 2.5d world. It will rely on localization data from our Kalman filter that performs sensor fusion, and it will send commands to our robot, so it follows the path.

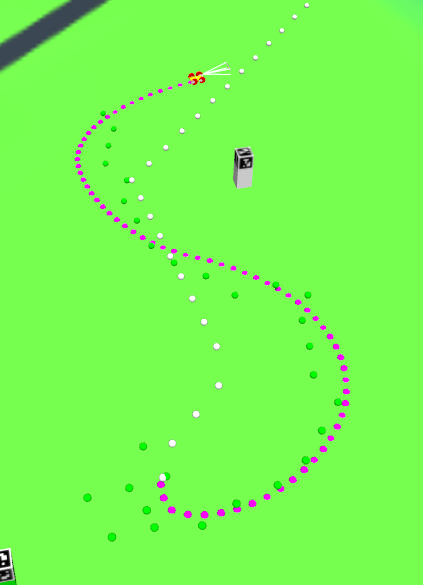
Mar 12, 2025. A* Grid Algorithm with Dynamic Cell Sizes.
The A* Grid Path Planner introduced earlier is a great illustration of an A* algorithm, but it is not very practical. Let's say we have a map with side length equal one kilometer. And we want our navigation to be accurate within one meter. That gives us 1000 x 1000 = 1,000,000 cells and the algorithm becomes unpractically slow.
In the same time, if we use larger cells, the objects that are smaller than the cell size might be ignored. For example, the only bridge across the river. And the path planning will fail.
A solution is quite obvious: use larger cells when the area is painted same color, and smaller cells in the areas where colors change. That reduces required number of cells dramatically. This is usually refered to as A* Grid Algorithm with Dynamic Cell Sizes

Of course, same algorithm works in Gazebo:
Mar 7, 2025. PCB Editor. Very basic.
There are many PCB editors. Large and strong teams create and maintain them. Why do we need another one?
Because it is simple.
It is probably the simplest PCB editor in the world, it took me just four days of coding.
It allows to design simple one or two sided PCB circuits and even to export them as gcode files so you can print them using 3d printer.
Feb 10, 2025. Multiple robots: alternative.
Tired of generate_launch_description?
Three (1, 2, 3) long, advanced, and not quite complete articles, explaining some ways of dealing with multiple robots in some alternative ways.
I am not sure if they are really necessary, and if they are, that they should be presented in their current form.
But.
I do know that the approach from article 2 solves the problem of debugging ROS2 applications (local machine only) in a much more elegant way than a "recommended" approach (configuring additional files etc).
The idea is to NOT compile project at all, and to debug it as a Python code, in place.
I do not recommend using this code, but learning from it is definitely a good idea. In future I will create a complete working project based on (2) and show how to use it in parallel with an official approach (which is using generate_launch_description, by the way).
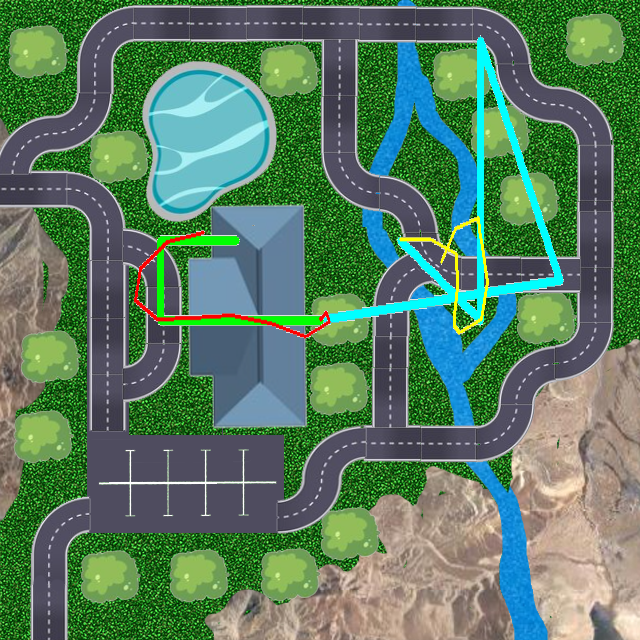
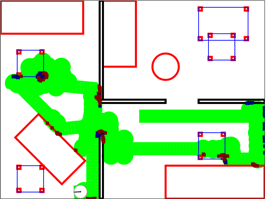
Feb 9, 2025. A* Grid algorithm in 2.5D world.
A very simple intro to using A* Grid in 2.5D world.
On the following screenshot you can see two robots with two pathes. Note that a path looks like a zigzag, which is understandable: it goes from one cell of a grid to another (A* Grid algorithm). I will address smoothing in later sections.
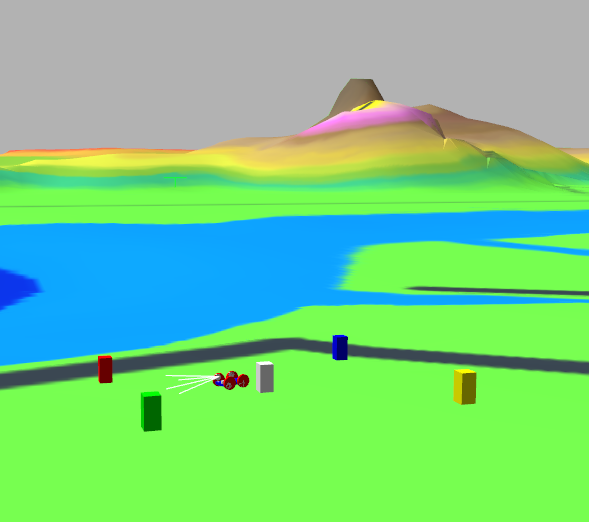
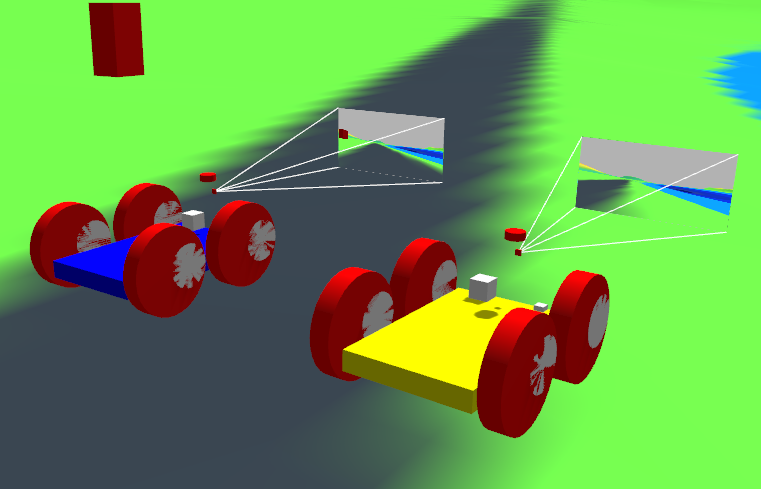
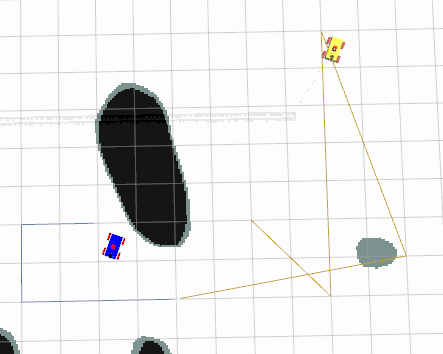
Jan 5, 2025. Aruco markers as 2.5d Landmarks.
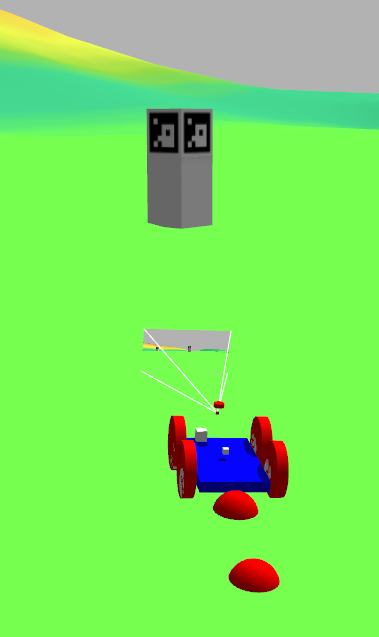
Finally, my 2.5d navigation supports landmarks. So far, this is the easiest kind of them, one using aruco markers.
Those are great for indoor navigation, in a controlled environment. As this is a tutorial, I made it work outdoors, though I do not think it is the best possible solution: having 1 meter aruco boards all over your land is plain ugly. Unless it is an industrial environment, like a mining site.
Aruco were chosen because all computer vision work is already done in OpenCV, so I do not have to focus on recognition part. In future, i will add other types of landmarks, like road signs, hills, trees, houses, sun and stars and maybe, other robots.
Dec 24, 2024. Robotics Hardware updated.
Before, there was simply a link to a rather messy catalog. Now it is possible to navigate my robotics hardware articles using tree on the left.
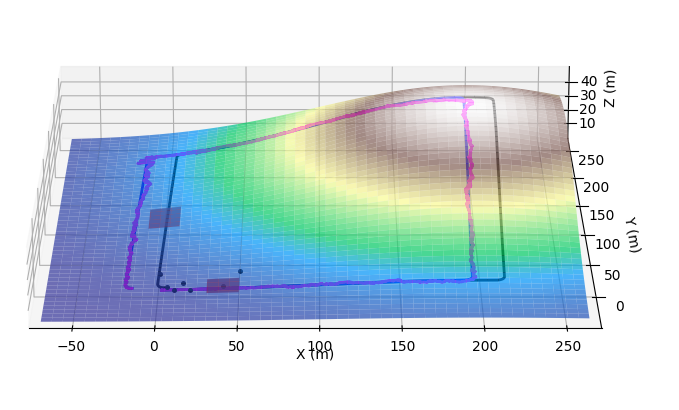
Dec 15, 2024. Sensor fusion and Localization in 3D world: a complete example.
Finally, a complete example of (one of many possible approaches to a) localization in 2.5D world. Robot is made aware of its position on a 2.5D surface, both in Gazebo simulator and in a faster home made one. Robot uses additional data from the map. And so on.
In a real life, fusing random subset of awailable sensors is not something you usually do, but as this is a tutorial, the goal is pretty ambitious: any combination of sensors should work for localization.

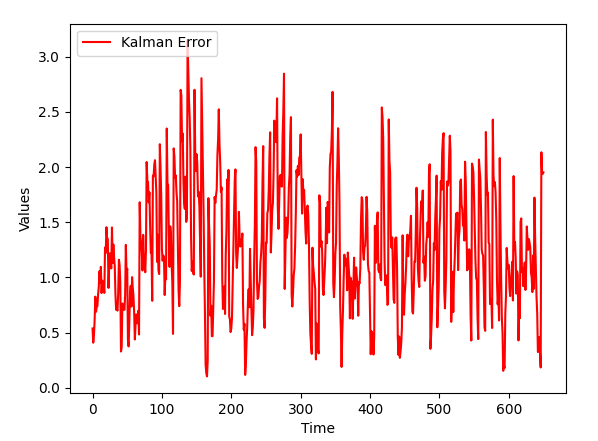
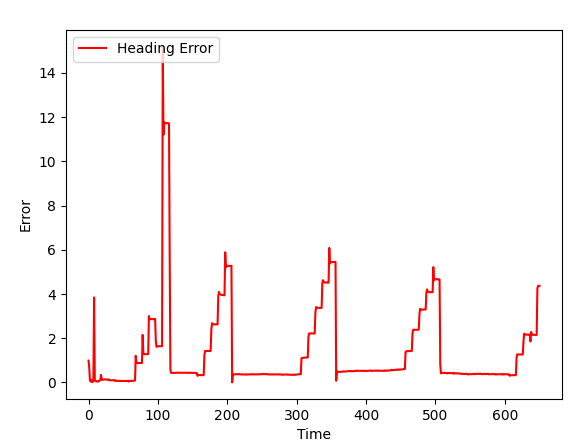
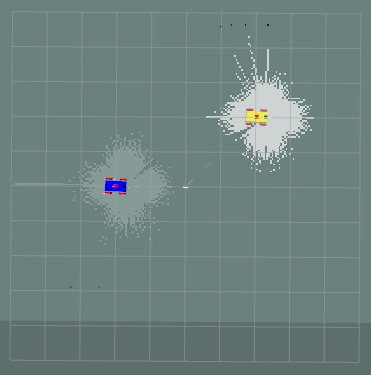
Aug 4, 2024. Sensor fusion (2d world so far).
A long article with lots of images illustrating sensor fusion for our robot localization, as well as possible problems and workarounds.
Unlike most tutorials online, I have created a very unfriendly testing environment with slippage, large sensor errors etc. Resulting localization routine is less accurate but more robust and can survive situations when some sensors are suddenly not available.
As for "2d world" limitation, I am going to switch to 2.5d in the following sections.

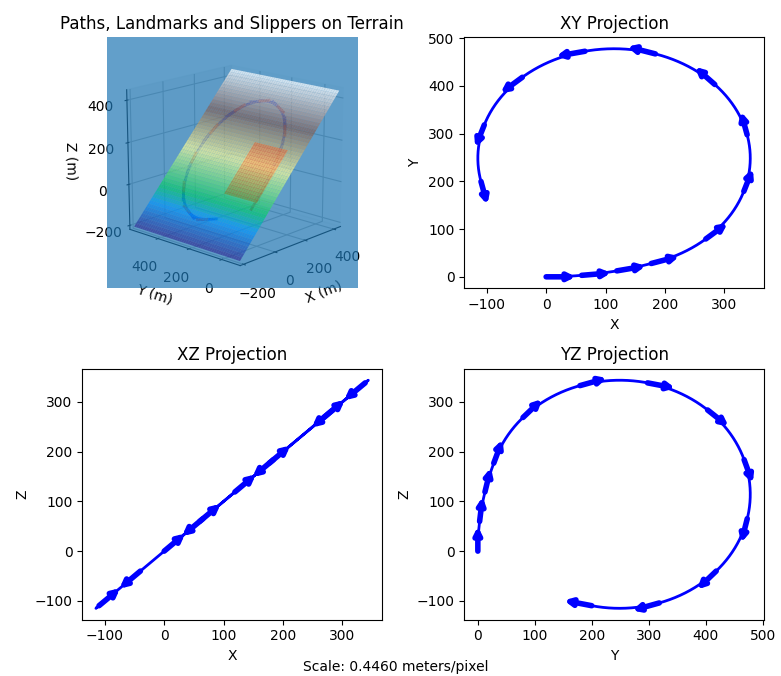
Jul 28, 2024. Localization that is aware of slippage and drift.
This article adds proper simulation of wheel slippage to localization based on Unscented Kalman filter to ROS2 / Gazebo simulation.
This slippage includes both sliding due to slippery road and by-design slippade of some robots, for example, ones using 4 wheeled dif. drive.
Localization works properly both in a Gazebo simulation and in a simulation without Gazebo (which is much faster though not as advanced).
So far it is a simplified (2d world, no sensor fusion) version; I am going to gradually improve it in the following sections.
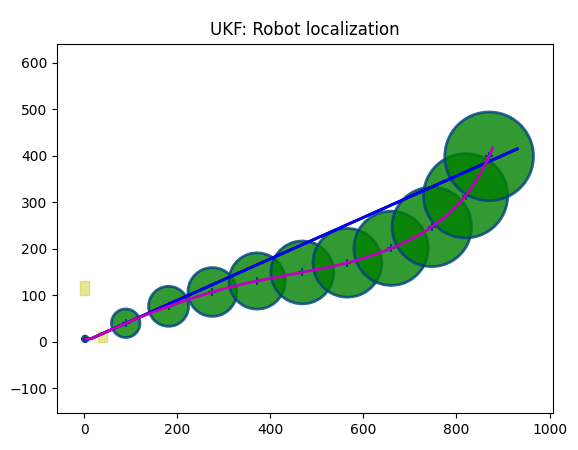
Jul 17, 2024. UKF Localization for ROS2.
This article adds localization based on Unscented Kalman filter to ROS2 / Gazebo simulation. So far it is a simplified (2d world, no sensor fusion) version; I am going to gradually improve it in the following sections.

Apr 17, 2024. Unscented Kalman Filter for 2.5D Navigation.
Sample code to illustrate the use of Kalman filter in robot localization. Multiple sensors, dynamic sensors configuration, merging sensor data and so on.

This is an introduction, with code explained. In the following sections I will implement it in ROS2.
Mar 26, 2024. FPV navigation Utility.
In two words: the world has changed, the robot has changed, and we now have a First Person View tool to control any of multiple robots in a simulation.

In one of the previous sections we have created the teleop_gui, which was a rather primitive utility imitating the corresponding ROS2 command line tool, plus some UI. This tool is no longer supported (though the article is still there, so it can be used as a source of info).
Instead, a more advanced and universal dashboard to control robots in a multi-robot environment was created

The teleop_gui utility works with mouse (you can move the control knob imitating the joystick) and with arrows. Space bar is for STOP command. Robot moves and turns at different speed (depending on the position of a knob).
Parameters of the world and robot's materials changed, so friction is realistic and robot can handle rather ragged terrain:
The center of gravity was moved down, camera was moved up for better view, and all sensors were moved forward, just to keep them in the same place.
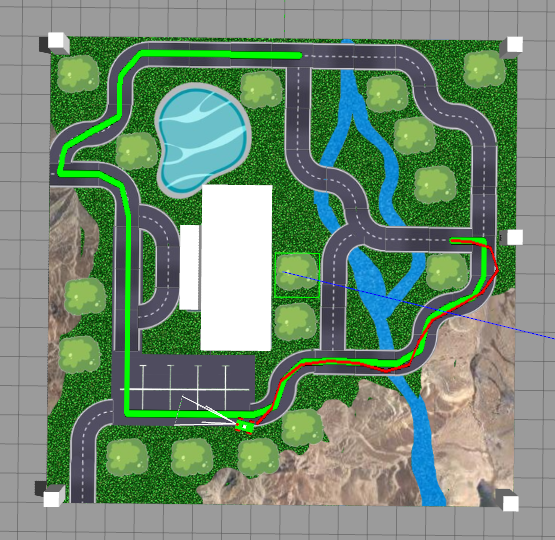
Mar 14, 2024. Adding roads to 3d World Mesh (with texture).
In the previous section, we learned how to create 2.5D landscapes from a topo map, turn them into a textured DAE file and use them in a Gazebo simulation.
However, topo maps have one huge "incompatibility" with the real world, which is called "roads". A road hhould be smooth, it should follow the landscepe, BUT it should be horizontal in the direction perpendicular to its orientation. In other words, while driving along the road, your car should tilt up or down, but not sideways:

When building roads, construction workers make them horizontal (in an "across" direction) so that a car doesn't slide off the road. The question is, how can we do it using topo map?
The answer is, we probably should not. Topo map is for smooth hills and valleys, while the road should be created in a way similar to what construction workers do: by removing part of the landscale and adding the road instead.
And of course, we should do it on a mesh, not at the topo map.


In this section, I am going to add this functionality to landscape generator (topo_3d.py utility). It will level up ground for the road, add road, stitch together the road and the rest of the landscape in a watertight (no holes) way and even add roads (darg bands) to the texture to make it look nicer.
... click for more images:


Dec 20, 2023. Creating 3d World.
Unfortunately, Nav2 utilities of ROS2 are mostly dealing with the flat world. In the same time, the real world has hills your robotic tractor has to plow, caves it has to explore, not to mention canyons it should stay away from.
In this post I am going to begin a rather long journey towards 2.5D navigation, and the first thing we need to do it to build 2.5D world. Traditionally, in Gazebo 3d meshes are used, and we even can pull textures on them... except the process of building these objects is far from straightforward. Just search the Internet forums to see lots of confused people. Let's create a tool that will help us building textured 2.5D meshes.
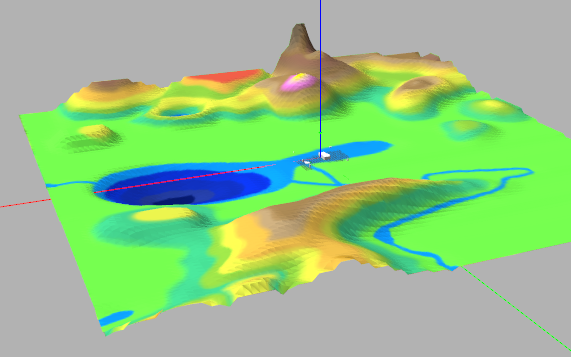
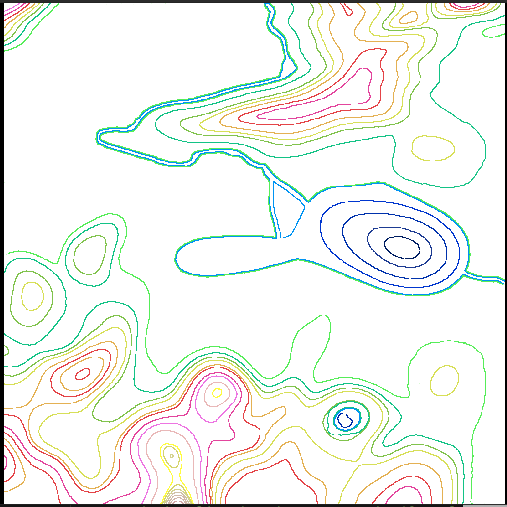
The utility takes a colored topo map as a source:
... and produces a DAE mesh with a texture mapped to it.
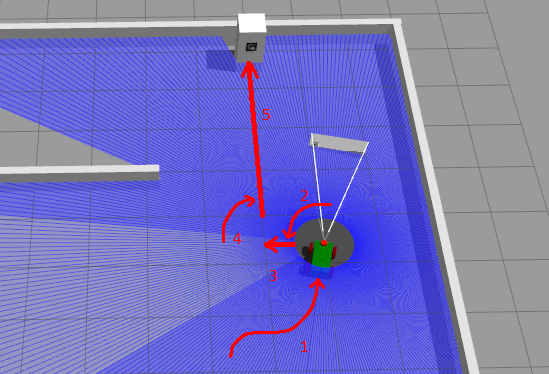
Nov 23, 2023. First and last mile.
Imagine that you have parked you robot at a parking lot, next to a highway. There is a nice paved road connecting parking with a highway, and a ditch that is occupying the rest of space between them.
So far we used A Star Graph navigation algorithm on a road that had graph and if the initial position of a robot was outside the graph, well, we just used straight line navigation to get to the closest node of a graph.
There are few problems with this approach. First of all, if you drive from the parking lot to a road by a straight line, you will most likely end up in a ditch. Second, there is also a "last mile" problem, which is "drive there by a graph and then go to parking at your destination". Current implementation of our a-star navigation algorithm doesn't have this functionality. Third, we might want to drive along a highway, then do some cross-terrain driving, then highway again and so on, in other words, what if we need to randomly switch from graph based navigation to grid based navigation and back?
In the following project, a simple solution is implemented: robot uses a-star grid navigation to get to the road, and a-star graph navigation as soon as it is close to nodes (as soon as it is on a road).

Nov 22, 2023. Adding A-Star (Grid) to our Project.
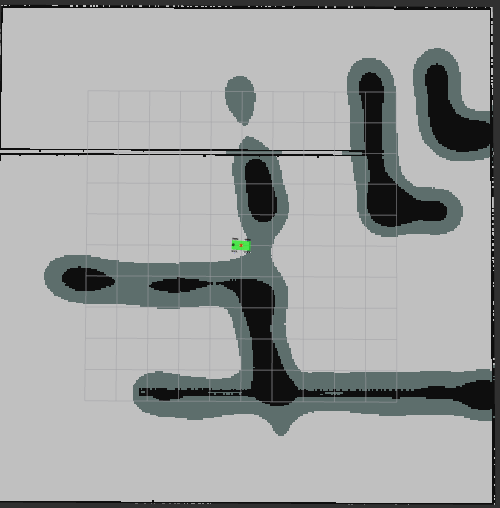
The ROS2 project now supports navigation based on keepout map, using a-star algorithm. Should also work with multiple robots, but not tested yet (will be in the next iteration).

Nov 15, 2023. Adding A-Star (Graph) to our Project.
The ROS2 project now supports navigation through array of graph nodes, using a-star algorithm. Should also work with multiple robots, but not tested yet (will be in the next iteration).
Nov 1, 2023. Path Planning with A*
A* algorithm is a faster alternative to Bellman-Ford and is widely used to find a shortest path in a graph. In this section I am going to provide two versions of code for two different scenarios of use.
The objective is to find the optimal path from start point to a destination point taking into consideration distance and road conditions (or "price") associated with a particular path (dirt roads vs highway or toll roads vs free ones).
A* algorithm is one of the most used for navigation, as it is reasonably fast, accurate and customizable. In this section, I am going to implement two versions of A-star algorithm, one for an "uncharted" land, and one for an existing road network.
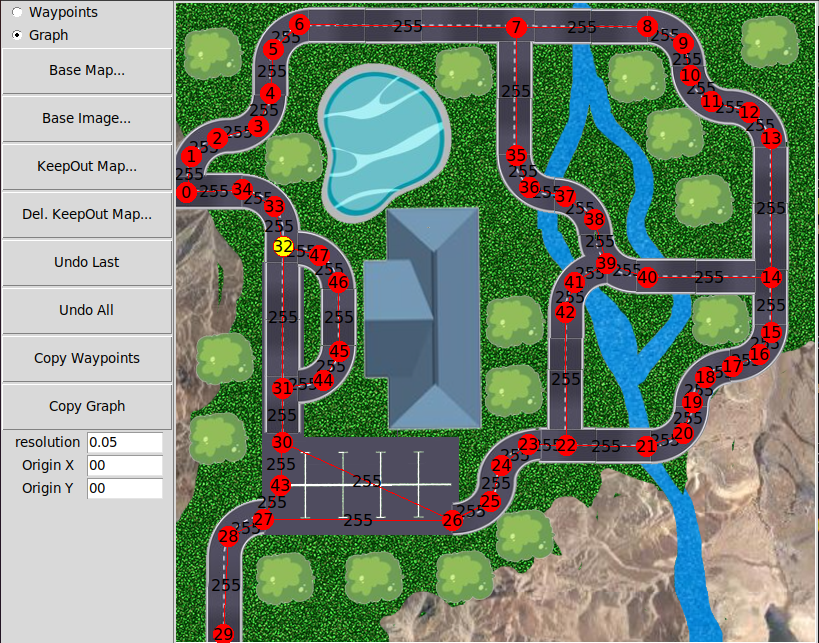
Map Editing Utility
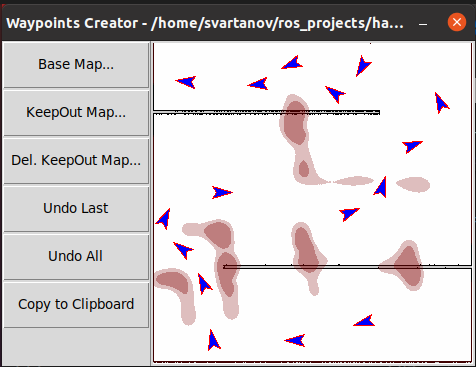
Waypoints editor I have introduced earlier now changed into a full scale ROS2 map, waypoints, graph and keepout zones editor.
Straight Line Path Planner
In ROS2, Path is a set of linear segments. As coordinates of the end of one segment are the same as coordinates of beginning of the next segment, it is convenient to store path as an array of points.
Path following code will figure out all the necessary turns based on coordinates of segments start and end points. A custom Path Follower class will then be used to navigate through the path.
As usual, supported both single and multi robot cases.
Path visualization in RViz and Gazebo, dynamic video map in Gazebo
In this project I will add path visualization in RViz, both simple one (by publishing path) and more visual one, with markers:

Same can be done in Gazebo, plus a ground in Gazebo world can be turned into a video screen, with map, ddynamic routes and everything:
Custom Algorithms
I am going to overwrite some Navigation (and not only) algorithms, because I do not like the way they are implemented in Nav2, and because I do not want to deal with black boxes I have little control over.

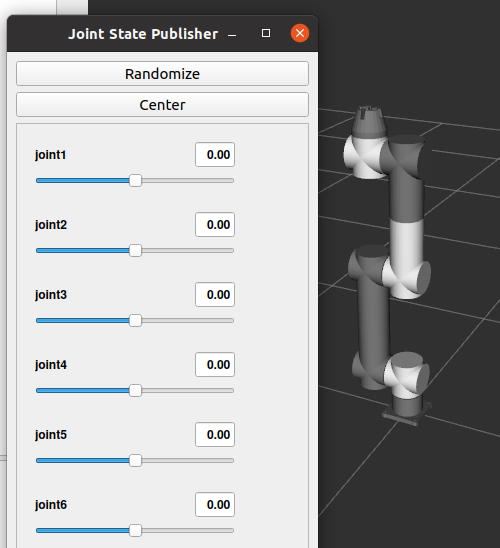
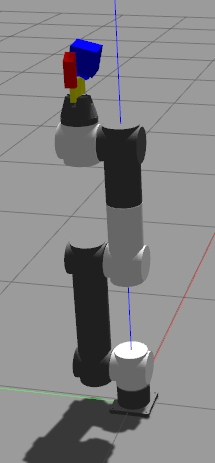
Robotic Arm
Let's create a fully functional robotic arm, make sure it can move to a specified position (forward and reverse kinematics) and pick up objects in Gazebo (now, THAT was a tough one!)
Multiple robots
Let's create a project for multiple robots, and make sure we can visualize them both in RViz and Gazebo! Let's also make Nav2 algorithms work with them.

Navigation: examples
Creating map from an image, ROS2 Nav2, Waypoint Follower, Navigating with Keepout Zones, Navigating along given path, Utility to add waypoints to a map, Navigating to a battery charger, docking to a battery charger.
I use Nav2 packages to do all that - for now.

Making sure Gazebo and RViz are closed
Often, when you close Gazebo, RViz doesn't close, or when you close RViz, Gazebo (either client or VERY often, server) keeps running, or when you press CTRL-C... same thing. Let's fix it.
We are going to add event handlers that, when Gazebo dies, kills RViz, and when RViz dies, kills Gazebo.
Moving to Galactic
From this point on I am switching to ROS2 Galactic. The reason is, a signifficant part of navigation functionality is not implemented in Foxy.
Navigation: Improved project
In this section, we are going to finalize the design of our robot, so that it can use different planner and controller algorithms to perform navigation tasks.
Note that the launch file can now take bunch of parameters: file name for the world, file name for the map to load in RViz and so on. One of such parameters is slam, which can be True or False. Depending on that parameters, we either launch slam tools or not. In our particular case, we use this parameter to either create a lidar-based map and save it, or to load a pre-saved map in RViz.
Occupancy grid
This bot allows us to do pretty much the same as earlier version did (drive around and save the map), however, the entire system of launch files is now altered to make launch more flexible. We are going to start the changes here, and finish them in the navigation_bot_05 section (next one). Overall, the launch structure will now mimic what official ROS2 documentation has for sam_bot, except some problems are going to be fixed.
Mapping and Localization
The robot that we are going to create in this section will be able to drive around (we use keyboard commands), and as it drives, the lidar will create a map. Then we will be able to save this mat to disk for future use.
Navigation: Sensors
Here are some examples of commonly used sensors: lidar, radar, RGB camera, depth camera, IMU, and GPS. To make things more standard, ROS2 provides the sensor_msgs package that defines the common sensor interfaces. Accordingly, users can use any sensor by any vendor as long as it follows the standard format in sensor_msgs.
As some examples of such messages, let's mention the sensor_msgs/LaserScan, sensor_msgs/PointCloud2, sensor_msgs/Range, and sensor_msgs/Image.
In addition to sensor_msgs package, there are also the radar_msgs and vision_msgs standard interfaces you should be aware of.
Let's add some sensors to a robot that we have created in a previous section. Particularly, we will add a lidar sensor and a depth camera (note: we are still following the official "sam_bot" tutorial, except, we do it step by step).
Robot setup
Wheel encoders, adding IMU sensor, using localization package.
ROS2 Navigation: Basics
This is an introductory chapter, it contains some theory. At the end you will get the robot, that is configured properly, so in the following sections we are going to use it as a base for navigation.
The theory is important though, as otherwise some details can easily be missed, so - regardless the fact that this code will be repeated and improved in later sections - I strongly recommend following this chapter and making sure the code works in your workspace, just for the sake of an exercise.
The robot I use in this section is based on a ROS2 official documentation, particularly, on a sam_bot. However, as always, there are some minor (or not so minor) problems I had to fix, plus sam_bot is written in a "one example covers all" style, which makes gradual learning difficult.
Instead, in the next few sections, I am going to create a simple bot, and add complexity in a step-by-step way. Result will be same as in an official tutorial, but learning will be much easier.
ROS2 tutorial: Differential drive
To make it clear: ROS2 offers not one but two solutions under the same "differential drive control": the differential drive itself and a "skid drive". Plus, we can also implement "Ackermann steering vehicle" using the ackermann_steering_controller.
The diff. drive controller that ROS2 has can be used to drive devices with two wheels and a cast wheel: just picture robotic vacuum cleaner. This is a traditional application of a differential drive: two wheels can rotate independently, so the robot can turn "on the spot", and to help it to keep balance, a passive "cast wheel" is used.
This is what we are going to do in this section.

ROS2 and Gazebo
An introductory article to a large list of ROS2 tutorials I am about to start. Correction: a practical introductory article.
Using synthetic dataset for copter detection
In this post we are going to perform the image segmentation detecting a single quadcopter (one quadcopter per image) using a simple CNN. This aproach has its advantages: it is way faster than more complex YOLO, SSD or Faster-RCNN approaches. All we need is to show the image to a network and to get quadcopter's coordinates as an output.

Coins Classification using Neural Networks
During previous step we got a rather large dataset composed of pairs of images. Those images were uploaded to the Internet by people we do not know, and though they are supposed to contain coin's head in one image and tail in the other, we can not rule out a situation when we have two heads and no tail and vice versa. Also at the moment we have no idea which image contains head and which contains tail: this might be important when we feed data to our final classifier.
So let's write a program to distinguish heads from tails. It is a rather simple task, involving a convolutional neural network that is using transfer learning. Same way as before, we are going to use Google Colab environment, taking the advantage of a free video card they grant us an access to. We will store data on a Google Drive, so first thing we need is to allow Colab to access the Drive
Head or Tail?
During previous step we got a rather large dataset composed of pairs of images. Those images were uploaded to the Internet by people we do not know, and though they are supposed to contain coin's head in one image and tail in the other, we can not rule out a situation when we have two heads and no tail and vice versa. Also at the moment we have no idea which image contains head and which contains tail: this might be important when we feed data to our final classifier.
So let's write a program to distinguish heads from tails. It is a rather simple task, involving a convolutional neural network that is using transfer learning. Same way as before, we are going to use Google Colab environment, taking the advantage of a free video card they grant us an access to. We will store data on a Google Drive, so first thing we need is to allow Colab to access the Drive
Classifying coins by value
In our first tutorial we used the image segmentation tool (YOLO) to find the coin (or coins) in the image and crop them. In our second tutorial, we have created a classifier to figure out if this particular cropped image contains "head" or "tail". Now it is time to learn to classify images by their value.
Classifying coins by year
This is the 4th tutorial dedicated to coins classification. So far we were using the same approach: transfer learning CNN. And here we go again, we use it for classifying coins by year.
So why don't we classify it all in one pass: head-or-tail, value and year? All it takes is having a classifier with combined outputs, right? The reason is, we don't have large (and clean) enough dataset. Even with my 20K+ images, it will suffer for some years as there were only limited minting that year and I only have few images. So if I break them additionally for side/value/year... The net will undertrain.
The second reason is, we are NOT classifying coins yet! What we do is building a dataset for a "real" training! That's right, all we did so far, including current tutorial is sorting out a huge heap of images I got (automatically) from online, and marking them, assigning labels. To train a network for classification by values, we need, say, 100 images per coin. So a human (who else?) have to select about 400 images (1R, 2R, 5R, 10R). But if we wanted to train a net for value AND year, we would have to select, ideally, 100 coins per each year and value, which is 2000 images (Russian coins were chosen for this task because they have relatively short history, from 1997, but still, it is about 20 years).
Water Melon Ripeness tester using Neural Networks
Full cycle of development: from Keras Neural Network on Python to Android application on Google Play
The program attempts to determine the ripeness and sweetness of a watermelon: you knock on the fruit, it is analyzing the sound of it. I am going to perform a full development cycle, up to uploading the program to Google Play and improving it in an automated mode using user feedback.

Dog Breed Identifier
Full cycle of development: from Keras Neural Network on Python to Android application on Google Play
In this tutorial i am going to walk through a Dog Breed Identifier: we are going to create and teach a Neural Network, then we will port it to Java for Android and publish on Google Play.

Can we use Peltier Elements for Freezing?
Peltier elements are known as a simple alternative to compression coolers and we can often see opinions that they can be used to produce deep freezers, going as far as -40C. This is... kind of true. However, there are some formidable challenges on this path making Pelier elements nearly useless for practical freezing applications.
XY PWM Frequency Generator
This is part of my Cryonics project: i am going to check the claim of some Japanese companies that water freezing point can be affected by EM and electric fields. The Generator will be used to feed the coil, producing EM field of different frequencies. I am going to publish results here when they are available.
NRF24L01 2.4 GHz Transceiver Module.
There are many ways of sending data between Arduino (or similar controller) and something else, and one of the most convenient is by using NRF24L01 transceiver module. It uses the 2.4 GHz frequency and it can operate with baud rates from 250 kbps up to 2 Mbps. The higher the baud rate, the shorter the distance, but if used in open space and with lower baud rate its range can reach up to 100 meters. Plus, there are also anthennas to increase it..
Pulse and Cardiography: MAX3010X (101, 102, 103)
These are cheapest solutions on market, and I'll try explaining why they should not be used.
74HC 4051 8 channels multiplexer
Sometimes we only have one analog port available on our controller, and still have to read data from multiple sensors. This simple chip ptovides a nice solution.
Multiple Analog Sensors with NodeMCU Web Server
ESP8266 is one of the most populat chips for Internet of Things programming. Unfortunately, it only has one analog pin (A0), which is not enough in case you want to read multiple sensors. A common solution ot this problem is using a multiplexer: it has multiple inputs and you call (programmatically, in real time) tell it which one to read, or to put it differently, which one to conect to its single output.
In this tutorial we are going to use 74HC 4051 - a 8 channels multiplexer. We are going to create a server that provides a web page. This web page is similar to previous example: it allows sending commands to 8266 (turn light dione on/off), and receives thermistor-provided themperature data. The difference is, we now have two thermistors (and can increase it up to eight), so we use a multiplexer.
NodeMCU Web Server + Thermistor
In this project we are going to create a prototype of a remotely accessible sensor (one so far, for multiple sensors, see the next tutorial).
In other words, you will be able to read sensor (thermistor, in this example) data, which means receiving data FROM server. You wil also be able to send commands to server, in our case it is going to be turning on and off the light diode, but same logic applies to controlling motors and so on.
Important note: we are going to create a web server that works with your modem within your LOCAL network. It can not be seen from the outside Internet. So you can use this approach for your IOT projects, but can not post data to the Web (a different approach exists). The "local" approach is generally safer, so when it comes to IOT, it should be considered first. In other words, this project is for sending data from the window in the second floow to a computer on a first floor, nothing else.
ESP8266 Examples: NodeMCU Web Server
In this post we will build an ESP8266 based Web Server and walk through both the code and schematics. This tutorial is a step-by-step guide that shows how to build a standalone ESP8266 Web Server that controls a single output (one LED). This ESP8266 NodeMCU Web Server is mobile responsive and it can be accessed with any device with a browser in your local network.
Please pay attention to the last statement: we are going to create a web server that works with your modem within your LOCAL network. It can not be seen from the outside Internet. So you can use this approach for your IOT projects, but can not post data to the Web (a different approach exists, it is just... different).
ESP8266 Examples: Reading temperature
In this tutorial we are going to read temperature from a simple 10K thermistor. By simple i mean, there are more advanced serial enabled devices... this is not one of them.
Thermistor is just a resistor that changes its value depending on the temperature. The idea of this project is in using diode bridge: we connect "+" (which is marked 3V) with "-" (the ground) through the resistor of a known value and a thermistor.
ESP8266 Examples: A simple Blinker
A "Blinker" program is a bare minimum to start with ESP8266. It allows you to turn a light diode on and off. Of course, to master this tutorial, you have to lear the board's pinouts, as well as installation and programming. In other words, if this subject is new for you, do not miss this tutorial.
Installing ESP8266 in Arduino IDE
We are going to use Arduino IDE
Arduino is a very popular controller, and its IDE is popular, too. So NodeMCU was
made compatible with it, and you can write Arduino code (just keep in mind that pin
numbers are different), and it will work.
Follow the link above to add NodeMCU support to your Arduino environment.
About ESP8266
A very brief introduction to what it is and why is it so popular. By ESP8266 here and everywhere else I mean NodeMCU, as it has all the necessary extras to make it easier to use the controller.
Robotics Shoulder
An introduction to building a DIY robotic shoulder, far from complete. Often, people rush into assembling robotic arms, downloading ideas from the internet... Well, if you only want it to be able to lift a match box, that's fine. But for anything strong enough to lift a basket of water, you either need to forget about cheap plastic solutions (and steel is 100 times more expensive), or keep certain pointers in mind. Here we go.

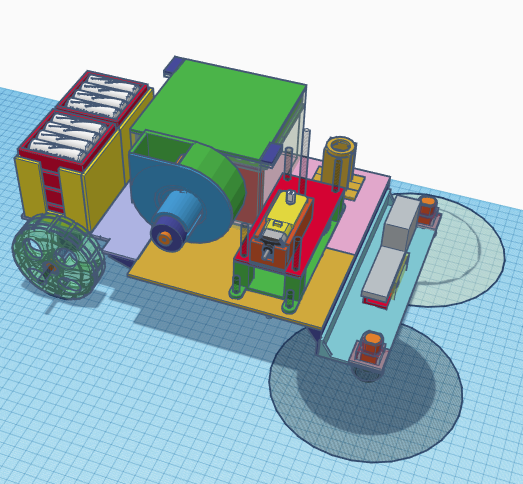
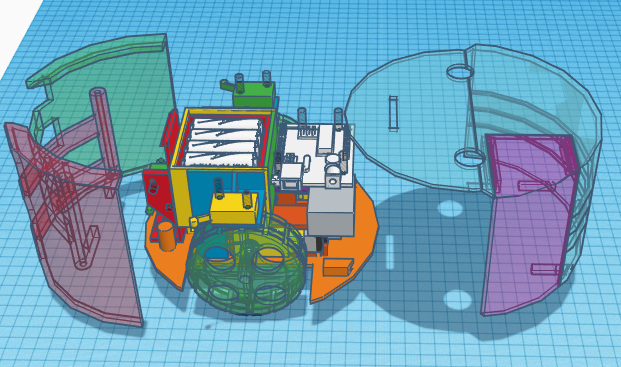
Robotic vacuum cleaner
Building a vaccuum cleaner involves more responcibility than one can possibly handle.
Will it work? Will it try to kill you? Will it fall in love with your lawn mover and run away?
In other words, one needs to stop and think hard. You know, like when a child wants a
doggy, and you tell him to get a rock first, to walk it, to feed it; and when, two
weeks later, the rock dies of starvation, you tell your kid: "no, see, you are just not ready".
And possibly, running a simulation or two might help.
Let's build a robotic vacuum cleanersimulator, one that can be used to figure out how
many sensors it really needs (three) and which room exploring algoritm is better. That's it. Simple?
Robotic Floor Washer DIY
In this tutorial I am going to build a fully working prototype of a robotic floor
washer. By "fully working" I mean that it is going to wash floor, instead of moving
dirt around like most robotic "moppers" do. While by "prototype" I mean it is
going to be the first step towards production-ready unit, but not a
production-ready unit yet.

Brainless Platform for a Robotic Vacuum Cleaner
When we hear "robotic vacuum cleaner", most of us would imagine a round thing with
a bumper, wondering around the room, controlled by a simple microprocessor and
acquiring the information from IR and Ultrasonic sensors as well as from the bumper
(which is nothing but a touch sensor).
Let's explore a different approach. Let's have no microprocessor and no sensors at all.
Still, the "platform" we are about to create will navigate around, finding its way from
under the furniture, and, given time, visiting every spot, cleaning it (if we install a
VC on the platform).
There is an important lesson for someone building robots: what can be done with advanced
electronics, can (not always) be also done using mechanics. How?
A very basic guide to building your own Roomba.
Prototyping a Robotic Vacuum Cleaner.
In this tutorial we are going to create a platform that can be extended to become a full
scale robotic vacuum cleaner. This particular platform as is will not clean anything:
it will move, use bump sensors to locate the walls and turn around to avoid them.
However, approaches we use are going to help you in case you need to create an
industrial prototype of the real thing.
Triplet Loss
A rather large article about using Triplet Loss, where I am trying to show what can be twisted and what the results will be.
Good luck.