Home
Tutorials
ESP8266 Examples: Reading temperature.
In this tutorial we are going to read temperature from a simple 10K thermistor. By simple i mean, there are more advanced serial enabled devices... this is not one of them.
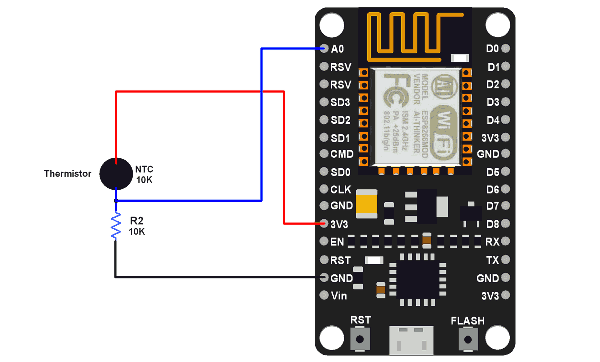
Thermistor is just a resistor that changes its value depending on the temperature. The idea of this project is in using diode bridge: we connect "+" (which is marked 3V) with "-" (the ground) through the resistor of a known value and a thermistor:

In this project we use a popular 10K thermistor. To calculate the temperature from sensor readings, we use the Steinhart-Hart Thermistor Equation (see below, in the code).
const double dVCC = 3.3;             // NodeMCU on board 3.3v vcc
const double dR2 = 10000;            // 10k ohm series resistor
const double dAdcResolution = 1023;  // 10-bit adc

const double dA = 0.001129148;       // thermistor equation parameters
const double dB = 0.000234125;
const double dC = 0.0000000876741;

void setup()
{
  Serial.begin(115200);
}

// ---

void loop()
{
  double dVout, dRth, dTemperature, dAdcValue;

  dAdcValue = analogRead(A0);
  dVout = (dAdcValue * dVCC) / dAdcResolution;
  dRth = (dVCC * dR2 / dVout) - dR2;

//  Steinhart-Hart Thermistor Equation:
//  Temperature in Kelvin = 1 / (A + B[ln(R)] + C[ln(R)]^3)
//  where A = 0.001129148, B = 0.000234125 and C = 8.76741*10^-8
  // Temperature in kelvin
  dTemperature = (1 / (dA + (dB * log(dRth))
	+ (dC * pow((log(dRth)), 3))));

  // Temperature in degree celsius
  dTemperature = temperature - 273.15;
  Serial.print("Temperature = ");
  Serial.print(dTemperature);
  Serial.println(" degree celsius");
  delay(500);
}
Important note: thermistor is an analog (as opposed to digital) device. As ESP8266 / NodeMCU has only one analog pin (A0), that's what we are using. Sometimes we need to have more than one analog sensor connected to our controller (say, indoor temperature and temperature outside). See list of available tutorials for a corresponding one.