Role of DAE format in Landscape Design
Unlike, for example, with map editing utility, in case of 3d world creator utility we need some code walkthrough. The reason is, Collada (DAE) format is not an easy thing to learn, plus it is not that well documented. Well, not exactly. It is well documented, but to understand this documentation you have to read it all. Considering the fact that we use just few percents of all Collada features, this looks like an overkill.
To start with, let's create a VERY simple DAE file. We are going to focus on our objective only (so, no animation, 2.5D instead of 3D and so on). Also, we are going to deal with rectangular slice of a 2.5 D landscape. "Rectangular" means that the X-Y shape of the land we are modelling is a rectangle (and therefore, we can use rectangular map for it), while "2.5D" means that Z is never duplicated for the same point. No caves (you can add them later using 3d mesh editor, if you want, but no caves on topo maps) and no hanging objects like arches, bridges or branches (if required, those should be added as separate models, to the world, not to DAE file / though it is just a recommendation ).
3d shapes are usually represented using triangles, as triangles allows to create "watertight" (no holes) copy of any object. Collada also allows you to work with polygons (the <polylist> element in COLLADA defines a mesh by polygons with arbitrary vertex counts). This is more general than just triangles, and we are not going to use it as - in our case - it provides no benefits.
So our first object will be a pyramid with rectangular "base" and four triangular "sides", made of triangles. To build rectangular base, we could simply use two triangles, but note that our objective is to create the landscape, which is a surface, not a 3d shape with volume. So we are going to build a pyramid without the base - just sides. Think of it as of the mountain for our landscape.
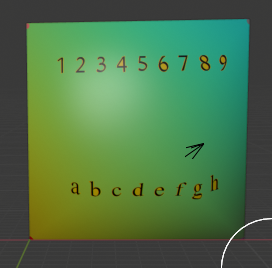
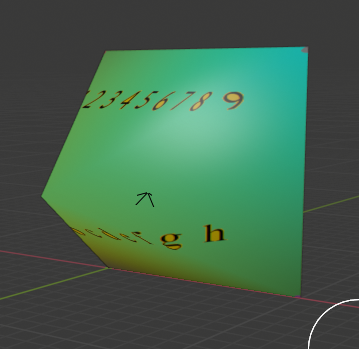
As you can see, I have pulled a texture over this pyramid. It is an important part of our landscape design: we want grass, paved roads and so on.
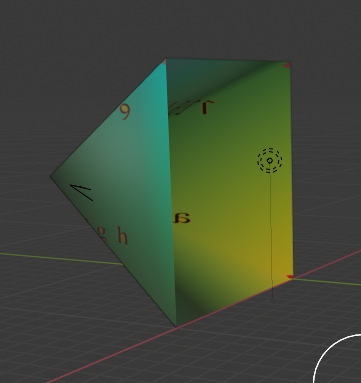
Now let's take a look at the code of the DAE file. First of all, we have a tag that tells whatever program is going to use it, that it is a Collada. Then we have "asset" tag, note the direction of Y axe (this is why our pyramid is sideways on pictures above). Looks like Gazebo ignores it:
Next, we have library_images tag. Collada can contain multiple textures, objects, materials and so on: we are only using one. So, this is a texture image, a bird's view of our landscape. However, as I mentioned earlier, programs like Blender use it from DAE, while Gazebo, for a reason I cannot fully comprehend, uses texture from .material file... even if you have this tag in DAE. So if you want to use material files the way Gazebo generally expects, comment this tag out (or not, I am not sure it affects anything)... and loose the ability to see texture in Blender.
Few words about Blender. It is a very sofisticated and not very stable program; its UX (user experience value) on a 10 points scale is solid confident zero. So, I am not going to support it, and / or investigate its work with whatever DAE files we produce. Gazebo will work with these files, Blender... might work as well. Or it might crash: I am not going to test it. The whole idea of this section is to learn to do things without Blender.
To understand the rest of this file, you should keep in mind the idea Collada uses. It defines things, like texture, as an array, and then it refers to its elements, by the index. So when you see something like <effect id="effect0"> - it is an array, and you can look for some other tag that refers to it: <instance_effect url="#effect0" />
Here we create <newparam sid="surface0"> that is initialized from a texture... remember that we plan to comment this texture out? Then we "indirectly involve" a built-in shader... Oh, well! Just paste this code :) It is a rather standard thing and it works just fine.
Another part of the puzzle: <library_materials> - it creates a material that we are going to refer to later. This material is based on "effect0" above, which is based on our texture. Again, this is a standard part of Collada, and all we need is to copy and paste it.
Now comes the fun part: a mesh. First, we have "positions", which defines coordinates of vertices in mesh units (this time in meters). So the first vertex of our pyramid is at (X,Y,Z): (0, 10, 0) and so on. We have four vertices at the base and one for the top of a pyramid: I have added an extra empty line to separate them. Again, keep in mind that while we only use a single shape, Collada can have many shapes in one file.
In the same tag you see "accessor": instead of hardcoding types of data array elements, Collada allows us to set it in place:
Next part of a mesh is "normals" array. It is used by the program (Blender, Gazebo...) to figure out how light is reflected from the surface, if you change its sign, the triangle will get the texture on the opposite side. In other words, if you do not want the texture to be mirror-reflected (look at the pyramid from inside to see it), you need to pay attention to those. The utility handles normals for you, but this particular file was created by hand...
Next, we have uv-source. See, when we have rectangular image to pull over triangles of a 2.5D (generally, 3D) mesh, we want to know which point of an image corresponds to which point of a surface. Easy? Nope. See, the map coordinates begin at bottom-left:
| (1,0) | (1,1) |
| (0,0) | (0,1) |
While image coordinates begin at top-left:
| (1,0) | (1,1) |
| (0,0) | (0,1) |
Now, let's take a look. See the problem?
According to "different coordinates systems", the first point in "positions" (0 10 0) should be mapped to (0, 0) in image. But it looks like it is mapped to (0,1)! The reason is, it is not mapping: we simply list points on texture, while mapping will happen in "triangles" section. Let's mark this question as (*) to refer to it in future.
By the way, what are the units of "uv-source"? They are not pixels, and they can not be meters, as it is just an image. They are image coordinates, normalized to 0-1 range. It is very convenient, as we can replace texture image with another one of different size, without changing the Collada file.
The next comes vertices tag. It says that we are mapping together three sources of data: positions, normals and uv-source. Therefore, in triangles array below, we expect 3 elements per item:
Note that I have commented out mapping for bottom of the pyramid, as I do not want it. triangles use "material0" defined earlier. Each line of the array is composed of three elements. Let's look at first row: (0 4 2): first (0) refers to first element of positions (0 10 0), second refers to 4th element of normals (0.0 0.0 -1.0) and third refers to 3rd element of uv-source (0.0 0.0). This is the answer to the (*) question above: we indeed map point (0,10) on map to (0,0) on image, as their Y coordinates point in the opposite directions.
The rest of DAE file can be ignored - it is, of course, important, but it will not change from case to case, at least in our project.