Home
Tutorials
Utility to add waypoints to map
Intro
The code for this section is located in utils/waypoint_creator part of an archive. Note that archive includes some additional folders, like maps and worlds, that are used by all projects and therefore are located outside of them. Note also that we use ROS2 Galactic now.
One problem that immediately pops up with the approach above: where do we get coordinates for the waypoints? We need some kind of a graphical tool, so let's create one.
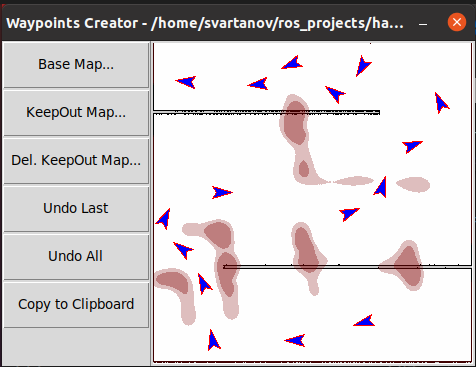
Here is a waypoints_creator.py utility. The idea is to load a map (which is just an image), and a corresponding YAML file. The YAML file has a "resolution" field (something like resolution: 0.05), that allows us to recalculate image pixels to meters. Then we can click on the map, every click creating a new waypoint. ESC deletes all waypoints, while "BACK" deletes the last one.
A waypoint, from the ROS2 point of view, has coordinates and orientation, which is a direction the robot should be facing when it arrives. So we are going to store both coordinates and robot orientation for a waypoint.
As this is a simple utility, we do not really know how we are going to use it in the "real" projects; therefore we can use any output format we want. If necessary, it is easy to change, as this is just a Python script.
I am going to generate the output in the following format:
                    goal_pose = PoseStamped()
                    goal_pose.header.frame_id = 'map'
                    goal_pose.header.stamp = navigator.get_clock().now().to_msg()
                    goal_pose.pose.position.x = -6.640000000000001
                    goal_pose.pose.position.y = 1.709999999999999
                    goal_pose.pose.position.z = 0.0
                    goal_pose.pose.orientation.x = 0.0
                    goal_pose.pose.orientation.y = 0.0
                    goal_pose.pose.orientation.z = 0.408169781175784
                    goal_pose.pose.orientation.w = -0.9129060355452321
                    goal_poses.append(goal_pose)
If you followed sections navigation_bot_07 and navigation_bot_08, you should be able to recognize this format: it can be pasted in the waypoint_follower.py or nav_through_poses.py.
The overall design is simple: we want to load the map by pointing at its YAML file; then on top of it, we want to load the keepout mask, again, by pointing at its YAML file. I am only going to support the trinary format for keepout mask. The keepout mask, when in this format, should be modified same way it is done in RViz: instead of using all 256 shades, we use 3: more dense for non-passable areas, less dense for unknown areas and completely transparent for passable areas.

We can then add waypoints by simply clicking on a map. The first click creates a "rotating arrow" that follows the mouse cursor. The second click finalizes the waypoint, in other words, the first click sets the waypoint position, the second one sets its orientation (it points at the mouse cursor).
We can the delete waypoints, and when done, copy the Python code for waypoints to the Clipboard.
GUI library
In order to create GUI, am going to use GUI library called tkinter. It is neither powerful nor convenient, but simple enough to save us time: after all, we are not going to create anything complex.
$ sudo apt-get install python3-tk
Walking through code
Here is the code for an utility.
Running
$ python3 waypoints_creator.py
Things to do
This utility is ok for our purposes, but there are many things that should be added if we want to turn it into a professional tool. I might do it at some point, in any case, it is not something complex.
TBD list:
Make windoe zoomable
Make map zoomable and scrollable
Currently, map origin and origin of keepout zones are the same: load
origin of keepout zones from its own YAML.
Load multiple (and possibly overlapping) keepout masks.
Support loading and saving waypoints from/to file.
Support multiple "chains" of waypoints, with individual colors.
... and so on.